Here is a recipe for the holy grail of video handling on your server: recording a video with a webcam from the browser, upload it to YouTube, and embed it on your site, all with one magic click. This technique is currently only possible with Drupal 6, although support for Drupal 7 should be ready soon, and should be even easier with the tools available there.
Here are some shortcuts to the relevant sections of this post:
Required Modules
Besides Media: Webcam, which will interface the browser with users’ webcams, the modules we’ll use for this functionality include CCK for attaching fields to content types and FileField, which can be used to store image snapshots (along with ImageField), as well as the recorded videos if you want to serve them locally and skip the YouTube options. We’ll also need Media Mover to pass our recorded files around, if we’re not serving them locally. This module will work in conjunction with Embedded Media Field and Media: YouTube to send and receive the video for storage with YouTube.
Next up, we’ll need to install Red5 on our server, which is an Open Source package that we’ll use for streaming video in conjunction with Flash. It’s a free alternative to Adobe’s Flash Media Server, and is capable of much more than the simple job we’re tasking it with. Unfortunately, installation of Red5 is not easy or intuitive, and might be a hurdle if your hosting provider doesn’t offer it or allow you shell access to install it yourself. More on that later.
Webcam Photo Snapshots
Let’s do the easy steps first. You won’t need Red5 for this first example, which will allow users to create snapshots with their webcam. After installing the contributed modules on your local Drupal 6 installation (see the handbook if you need help setting this up), go to admin/build/modules and enable Content (CCK), FileField, ImageField, and Media: Webcam.
Now we’ll set up a field to gather and store our snapshots. You can either set up a new content type, or use the default Story type. For the second option, simply navigate to admin/content/node-types/story/fields and add a new field, which we’ll call Webcam for this example. The type will be File, and in the last selector for the form element, we’ll choose Webcam Image & Video Capture.

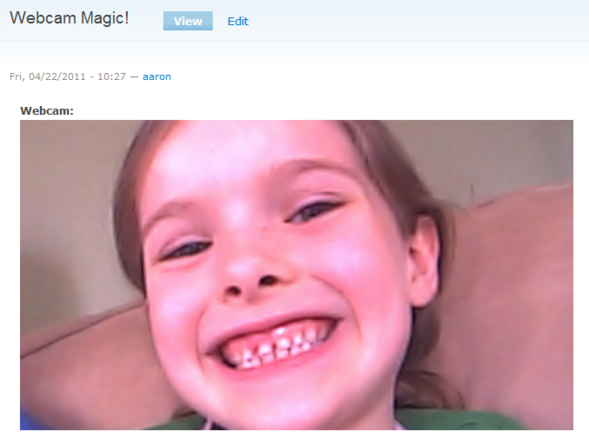
On the resultant page, check the Allow snapshot box and submit, and you’re set! Now add a node, at node/add/story, and watch the magic happen…
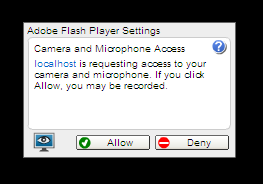
Note that you’ll likely want to change the display settings for the field. As it’s an ImageField at heart, you’ll have access to all the usual display formatters, including for ImageCache if installed. Simply navigate to admin/content/types/story/display and select the format to display for Teasers and Full nodes.
Recording Videos
Before we can add video capability, we need to set up our Red5 server.
Once you’ve gotten Red5 installed, you’ll need to copy the application file at /sites/all/modules/media_webcam/src/red5/media_webcam/dist/media_webcam.war to the webapps folder of your Red5 installation, for instance at C:Program FilesRed5webapps. Then you’ll either restart Red5 (from the Services window of the Administrative Tools of Windows Control Panel) or wait about 10 minutes, and it will automatically deploy.
Now we’ll configure Drupal to interface with Red5, by going to admin/settings/media_webcam. Here you can set the global width and height for the recorder on this page as well.
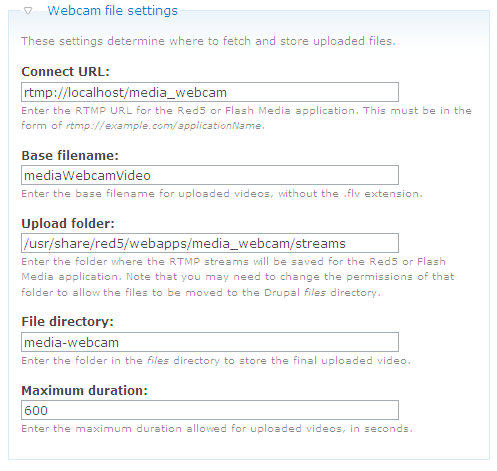
The Connect URL will be the address to access the Red5 server application, in our case at rtmp://localhost/media_webcam. Note that by default Drupal uses rtmp://localhost/oflaDemo, which is a demo application packaged with Red5. That would work, but you most likely will want to use the application packaged with the module above rather than leaving a demo on your production server.
You can leave the Base filename alone; this simply determines how final files will be named. You can change it if desired — the final names will have a randomly timestamp-derived numbers appended, with a .flv extension.
Next you’ll want to set the folder where videos will be uploaded, in the Upload folder textfield. Note again that the default is set to the oflaDemo folder; you’ll want to change this to the location where you’ll find the media_webcam Red5 server application. For Windows, that will likely be at C:Program FilesRed5webappsmedia_webcamstreams.
You can leave the File directory alone, unless you want to change the location in Drupal’s file system where the final video will be moved to.
Finally, you can set the Maximum duration allowed for webcam uploads. By default, it’s set to 10 minutes, or 600 seconds.
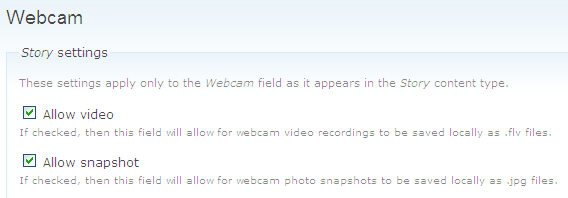
After submitting your settings changes, you’ll need to go back to the field settings at admin/content/types/story/fields/field_webcam and check the Allow video box. After submitting that, it should be good to test, by adding another Story node.
If you want to host your videos locally, then you’re all set! All you would need to do would be to set up a Flash player for display. There are many ways to do this; for a quick set-up, I suggest using jQuery Media with Longtail.
Bridging to YouTube
For integration with YouTube, we’re going to have to do some more setup. Firstly, you’ll need an account to accept uploads from YouTube. You’ll also need to apply for a developer API key.
On the Drupal side, you’ll need to install Media Mover, Embedded Media Field (with its included Embedded Video Field), and Media: YouTube. You’ll also need to enable the Media Mover CCK and Media Mover Emfield modules, which are packaged with Media Mover. Finally, you’ll need to install the latest release of the Zend Framework library at /sites/all/libraries.
Browse to the Media: YouTube Administration screen at admin/settings/media_youtube, where you’ll need to set the developer key. You’ll also need to add your YouTube username and password, which the module will need to send video uploads.
We’ll also need to add an Embedded Video field to the Story content type, with default settings. You can do that at admin/content/node-types/story/fields like you did with the Webcam field.

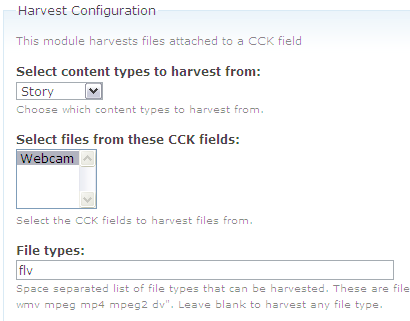
Next, you’ll add a new Media Mover configuration at admin/build/media_mover/add. Media Mover configurations allow you to harvest, process, and store files. For the Harvest Configuration, we’ll select the Webcam field of the Story content type. Additionally, we’ll need to set the file type from its default to flv, which is the format created by the Flash.
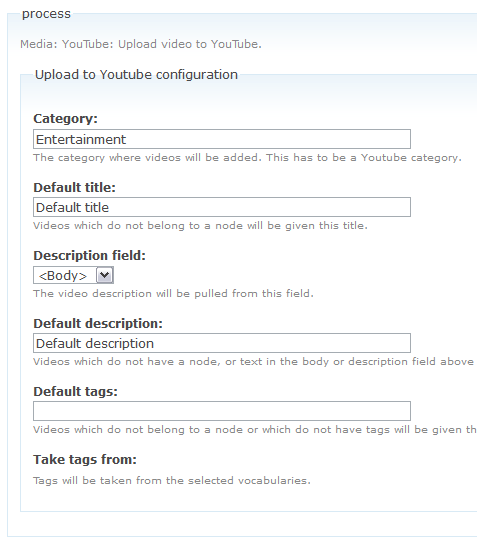
For processing, we’ll simply set it to upload the video to YouTube. You’ll also need to select a YouTube category.
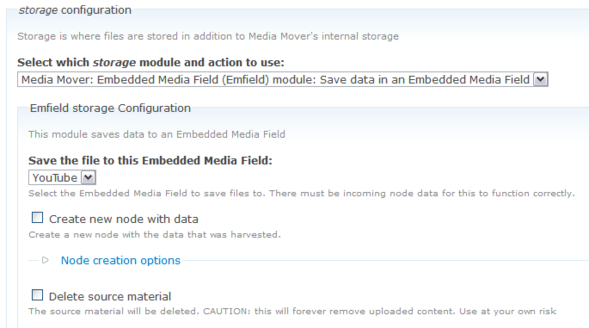
Finally, we’ll configure the Storage to save the resultant video in the Embedded Video field we set up.
That’s it. When you next record a video from the webcam in the browser when you add a new story, it will work automatically. Note that we’ve currently set things up to run on cron, so you might need to hit cron.php to get your video working. If you want, you can enable the Media Mover Auto Run module (packaged with Media Mover), and configure your process to run when you submit the node, rather than waiting for cron. You would do this at admin/build/media_mover/settings/mm_auto_run.
Caveats
That’s it! Here are a short list of potential gotchas:
- Make sure to use a version of Media Mover later than 6.x-1.0-beta9 if available, or at least 6.x-1.x-dev, due to a known issue that will block things.
- If you get an error like
Cannot authenticate. Error: Unable to Connect to ssl://www.google.com:443. Error #76170016: Unable to find the socket transport "ssl" - did you forget to enable it when you configured PHP?then you need to enable SSL on Apache and PHP. For WAMP, you can do this by clicking on the WAMP Server tray icon and enabling the SSL modules for each service (Apache > Apache Modules > ssl_module, and PHP > PHP Extensions > php_openssl). - If you get an error like
Upload failed. Error: Expected response code 200, got 400 yt:validationinvalid_valuemedia:group/media:category[@scheme='http://gdata.youtube.com/schemas/2007/categories.cat']/text(), then make sure that you’re using a valid YouTube category. You can see those categories if you open up the reference file (at http://gdata.youtube.com/schemas/2007/categories.cat); they’re like atom:category term=’Music’ and usually capitalized.
Also note that the buttons on the recorder are built with CSS, so you can replace them with your own images.
Aaron is currently writing Drupal 7 Media, to be published by Packt Publishing later this year!